


If you’re dreaming of teaching online while traveling the world, teaching English online as a freelancer allows you to create your own schedule and charge your worth. This is especially important now that so many of the typical online teaching platforms have closed down or readjusted their focus due to issues with the Chinese market.
Being a self-employed online English teacher means you'll never have to comply with a platform or be bombarded by changes that you don't have a say in. This is also great for English teachers who might not meet the typical requirements to teach English online, like being a native English speaker or having a TEFL certification.
While I'm focused solely on English teaching, you could use these tips to teach any language online as a freelance teacher. If you want to take it a step farther than just the basics of language learning, it's also possible to become an online language and communications skills coach, which is someone who focuses more on the nuances of culture while teaching the language.
I started my own freelance teaching business while living abroad in Australia and I love sharing my tips and tricks with other teachers. Here are 6 simple steps that you can follow to become a freelance English teacher like I am.

Step 1. Choose a Niche
To begin, the first step to teaching English online as a freelancer is choosing a niche. Think of a niche as a specific kind of English for your ideal target student.
In my case, when I started freelance teaching, I targeted romance language speakers who were studying for the Cambridge English exams. Romance languages are those derived from Latin, like French, Spanish, Italian, Portuguese, and Romanian. I chose this niche because I’ve studied Spanish, French, and Italian so I know what common errors to anticipate. I also have 5 years of experience helping students prepare for and pass Cambridge exams and students are willing to pay for classes that help them pass exams.
In general, you want to choose a niche that is a mix of your passions, what you are qualified to teach, and what is in demand.
Brainstorm what you enjoy teaching, what you are qualified to teach, and do a bit of market research to see what types of classes are in demand. (Hint: test prep, business English, and medical English are great niches!)
The more specific you can get, the more likely it is that students will be attracted to your classes. Instead of teaching “Intermediate English,” teach pronunciation for Japanese speakers, for example. Broad niches like “general English” won’t attract students as easily as specific topics.


Step 2. Validate Your Niche
The next step you'll need to take is to validate your niche. Validating your niche simply means confirming that it's a good idea and a profitable market.
When you have 2-3 ideas of which niche you’ll like to target, create a profile for your ideal student:
- Who are they? (Age, nationality, education level, etc.)
- Where do they “hang out”? (Which social media do they use, what are their hobbies and jobs, etc.)
- What are their pain points? (What do they struggle with the most? What do they need the most help with?)
Contact 10 people who are your ideal student and ask them about their pain points, what social media they use, how much they would be willing to pay for classes, how often they’d like classes, etc. These questions will help you decide if your niche is in demand.
This might sound familiar to you if you've ever started any type of business before. These are important steps to creating a brand that should never be overlooked. It's important to keep their importance in mind while doing these exercises. I know from experience how silly and annoying it can feel to go through these steps but they're an important part of the process and something you'll thank yourself for later when you're a thriving freelance English teacher.

Step 3. Choose a Curriculum and Platform
Once you have your validated niche, it’s time to decide on a curriculum to use in your online classes and a platform to teach on. You can either create your own curriculum or purchase a curriculum to use. Since freelance teaching is for-profit, you must have permission to use the curriculum in your classes, if you opted to buy or use one found online.
I personally create all of my teaching materials in Canva like presentations, worksheets, props, books , and more. Here’s a playlist of Canva Tutorials for Teachers if you’re new to Canva.
If you’d prefer to save time and purchase or subscribe to a curriculum, I suggest you try Crystal Clear ESL, ESL Pals, or Off2Class.
Zoom, Skype, and Microsoft Teams are popular platforms for online teaching. However, if you use these platforms, you’ll still need a way for students to schedule classes and pay. If you are looking for an all-in-one solution, I recommend LearnCube.
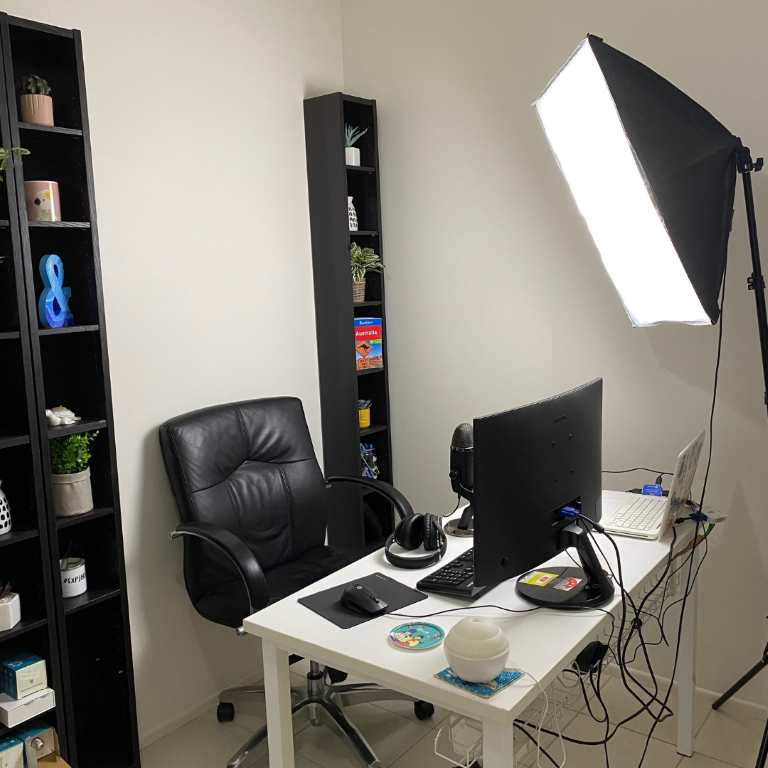
Step 4. Set up Your Online Teaching Space
When first starting out as a freelance online teacher, you’ll need a few basics:
- A computer
- A headset
- A microphone
- A webcam
- A nice background
If you are planning on traveling while teaching, you also need to choose the most portable equipment possible. These 6 steps to becoming location independent will seriously help you out while working on the go. Becoming a digital nomad can make for a unique teaching experience but it's one you'll want to prepare a bit for before diving right in.
It doesn’t matter which brand of equipment you choose as long as students can hear and see you. As your online teaching business grows, you can always purchase more advanced equipment. Here are some of my favorite online teaching equipment for all budgets.
In terms of a background, keep it simple. A blank wall or backdrop makes it easy for students to focus on you. A messy kitchen or living room does not. A portable backdrop is the best option if you plan on traveling and teaching.
Step 5. Find Students
Now that your online classroom is set up, you know what you’re teaching, and what your niche is, it’s time to find some students!
Finding students can be the most difficult part of freelance English teaching because it involves marketing. I know that you’d rather focus on teaching your students, but marketing is important and necessary if you own your own online teaching business. Keep moving forward - you can do it!
Here are some tips for finding students to fill up your classes.
Start an Instagram page
Post helpful tips that help your target students. Only post content related to your niche like tips, infographics, educational Reels, and carousel posts. When making your content, always think about what your target students struggle with the most and provide valuable tips and tricks.
In your Instagram bio, say WHO you help and WHAT TRANSFORMATION you offer. For example, “I help Spanish speakers prepare and pass Cambridge English exams”. You want your ideal student to think, “That’s me! I need that!”
Include a call to action letting your students know how they can contact you. For example, DM to book a lesson or click on the link to learn more.
These strategies can be used on all types of social media like LinkedIn, Facebook, TikTok, and more. Find out which social media platforms your target students are using and focus on these.
Word of Mouth
Don’t forget about the power of word of mouth! If you have current students, give them a discount if they refer a friend. Network and show up at events where your ideal students might be. Surprisingly, this is how I get most of my students!
If you still can’t find students, then it’s time to look into paid advertising. I recommend taking a course on Facebook, Google, or Instagram ads before setting them up. You can also set up a simple website and create a downloadable “freebie” in exchange for potential students’ email addresses.
If you aren’t interested in learning about marketing, get some help. It’s worth the investment and will help you in the long run. You can't teach online if you don't have students after all!
Step 6. Establish Pricing and Getting Paid
You’ve found your first students. Congratulations! But, how can they pay you? Depending on where you are located and where your students are located, you’ll want to consider different payment gateways.
Wise, PayPal, Stripe, and Payoneer are some of the most popular. Each payment gateway has different fees, so make sure to do your research before choosing one. Some of these payment gateways integrate with scheduling tools like Calendly.
Personally, I prefer to make and receive payments across borders is with Wise. They charge far less transaction fees than PayPal and will give you an account number just like a bank if the sender doesn't use Wise, too. Plus, you can get a Wise debit card that works virtually anywhere.
When it comes to pricing, I recommend having students purchase packages of classes, instead of selling them by the hour.
You can encourage them to purchase larger class packages by offering a discount. Have students pay for classes upfront so you don’t waste time chasing late payments.
Charge more per student for 1:1 lessons and less for group classes.
Be sure to also consider your cost of living and the cost of living for your students when pricing classes. Be sure to keep this in mind if you'll be teaching English abroad and hopping around different countries. Do your best to anticipate your cost of living so you don't run into any problems later when moving to a new country. If you have a lot of experience, don’t undercharge! Now is the time to charge your worth.
It’s also important to think about your rescheduling and refund policies. What happens if they have to miss a class or you have to miss a class? Write out your terms or a contract and have the student sign the agreement.
Final Thoughts
I hope this post inspires you to look into online English teaching. While it does take some time, money, and effort to get set up, once you are up and running it will be life-changing.
Imagine being able to schedule classes when you want, teach what you want, teach only students you enjoy teaching, and earn 100% of the money you make instead of paying a commission to an online company?! Now that's freedom!
If you have any questions about online teaching or teaching abroad, you can find me on my YouTube channel or my blog.
Happy teaching!


.png)
.png)